Showing posts with label recipes. Show all posts

Friday, 3 October 2014

Coconut Cake - an excuse for pretty flowers and styling {a recipe}


Cake solves lots of problems, don't you think. You know, not massive world issue problems, but those tiny at home daily challenges problems.

The making of a cake, for me, is such a restorative process (mostly). I love thinking about the cake I'll make, and gathering the ingredients  - seeing if we have the right things, or making do with what we do have instead. I love the preparation - getting the butter and eggs out. And then thinking about the sharing of the cake - that's the lovely part. Sitting down together and cutting into a cake. 
So - cake is good. Yes?
I wanted to share a current go-to cake, with you. It's easy to make, quite healthy, very delicious and ever so pretty when you want to pretty it all up. (Those of you who read this blog know that I don't often use a recipe - but there are times I need to know a cake will work with no issues and this one ticks so many boxes in terms of look, taste, ease of making and fairly healthy).

Coconut Cake with (coconut) Cream 
 6 fresh free-range eggs, separated
1 cup coconut sugar
1 cup plain flour (I use spelt or whatever you want)
2 pinches baking powder
2 cups shredded coconut or 1 cup shredded + 1 cup dessicated.
180g butter, melted (I always use salted butter in my cake cooking - it adds that little speck of salt)

For cream ganache / filling
1-2 can of coconut cream - place in the fridge for 24hours before ready to use
2-4T coconut sugar (the coconut sugar will turn your cream a beautiful golden colour)

How to:
Preheat oven to 180C. Lightly butter a 16cm spring form cake tin.

Using an electric beater, mix the egg whites until stiff peaks form and set aside.

In a separate bowl, beat the yolks and sugar until thick.

Gently fold a third of the egg whites into the yolks, with a third of the sifted flour. Repeat until all mixed together, then gently add the coconut and melted butter and fold through until just combined. It's ok if some of egg white can still be seen.
Pour into prepared cake tin and bake for 30-40mins  until golden and pulling away from the sides. Leave to cool and then remove from the tin. 

For the coconut cream ganache - Place one can of the cooled cream and 2T of the coconut sugar into bowl of an electric mixer and beat until light and fluffy. One can is enough for one layer of cake filling. 

To ice cake - slice cake horizontally into either 2 or 3 pieces, through the middle. Spread the coconut cream filling over each layer and carefully place them on top of each other. You can leave the top naked or cream it as well. This is the fun part - so I'll leave it up to you to decorate as you like. Toasted or large flakes of fresh coconut on the top is lovely too. 
Decorate with non-toxic or edible flowers. Please be sure you check that the flowers aren't poisonous before serving to your guests!
You can make as many layers as you like - make 2 cakes to make a giant cake stack of 6 layers!

Coconut cream is more of an 'adult' taste, so you can just as easily use regular whipped (cows) cream. You shouldn't need sugar with this as it's sweet enough on it's own. We like whipping it in a jar - shakey shakey. Fun and easy.
{I have started using a 16cm cake tin, instead of my usual 22cm as it makes a smaller but taller cake. I'm loving the tall cake layers at the moment, but not needing the giant 22cm size cake for smaller gatherings or family nibbles. This recipe is suitable for a 22cm cake tin - it makes two well-sized layers}.

*Recipe is adapted from "Coming Home" by Kathy Armstrong.
*Photos of pansy-topped cake are taken by Leah from Sang the Bird at my weaving workshop gathering. The cut-pansy cake photo is by me. Other photos are by me, at my daughter's 7th birthday party earlier this year. 
Pansy-topped cake has coconut cream and 16cm tin used. 
Zinnia-topped cake has regular cream and 2x 22cm tin used.

Thursday, 7 August 2014

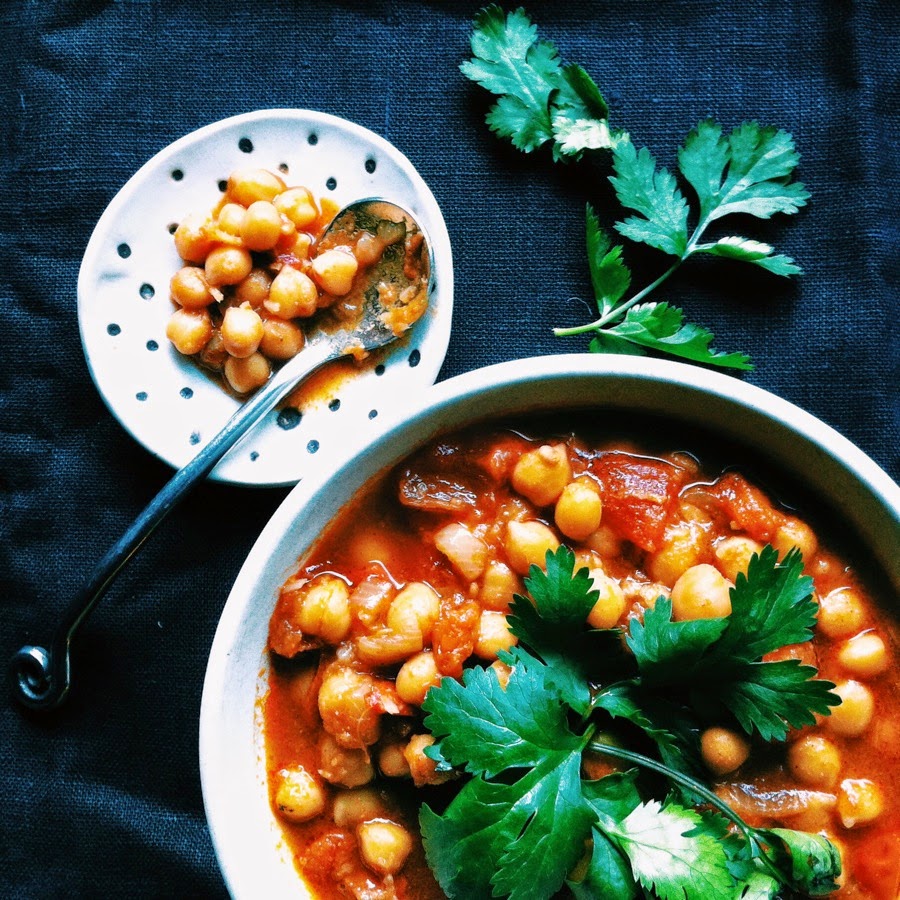
my dad's chickpea dahl {a recipe}


Today I made my dad's chickpea dahl. My dad is one of the best cook's I know. ......maybe the best..?? Anyway, he's a pretty excellent cook. We grew up eating his good healthy real made-with intention, thought, care, love meals. My mum was a great cook too. 
I think childhood memories of food and cooking and being in the kitchen with your parents are some of the strongest memories I have. I think maybe my siblings have similar strong food memories.

A couple of days ago Ari told me he wanted to make hummus for his school class party. He makes a pretty delicious hummus. As I won't buy tinned beans, it meant I had to soak raw chickpeas for his hummus making - so I decided to soak and cook a big batch at once. Which led to deciding what to make with the other chickpeas. And of course it being cosy fire-weather and warm nourishing dinners, I decided to make dahl. Luckily I got to ask my dad how he makes his. 

So - here's the recipe. In case you want to make:

Eric's Chickpea Dahl / Channa Masala -
(as with all my recipes, quantities are fairly inaccurate as I'm not so good at measuring...sorry. I think that's the best way to cook - but instinct and to your own taste). 


Ingredients:
1 cup dried chickpeas
3 cloves local or Australian garlic* diced
a knob of fresh ginger grated
1 onion diced (I use the purple ones because I like the caramel sweetness better than brown onions)
2t cumin powder
2t coriander powder
2t paprika or chillis
2t sea or rock salt (the one in the photo is pink Himalayan rock salt)
5-7 tomatoes diced
Olive oil or cooking oil
Fresh coriander.

The day before you want to eat your dahl you'll need to soak 1 cup dried chickpeas. Just regular water will do (of course we have beautiful rain water, so you should use filtered water if you have town water). Leave them in the saucepan to soak overnight. And then the next morning top up with water and put on to cook. The longer you soak them, the less cooking time they take. Bring up to the boil and then leave to simmer for some time - may take 1-3hours. Skim any scum that comes to the surface. You want to turn the heat off before they are fully cooked - a little bit of bite left, don't let them cook until falling apart. 

Heat a heavy based fry pan (I have a beautiful cast iron one that my parents gave me when I first left home all that time ago and I use it every single day) and add olive oil. I let the oil heat a teeny bit, then add the onion, garlic, ginger and salt and fry until all nice (don't burn it!), add the tomatoes and spices and fry until the tomatoes start to break down. A good five minutes at least. 

Drain the cooked chickpeas, but keep the cooking water. Add the drained chickpeas to the fry pan spicy sauce and fry for a further 10 or 15 minutes. Return it all to the saucepan and add a little of the retained cooking water if need. Put the lid on the saucepan and allow to slowly simmer for at least 3 or so hours. Stir occasionally and if needed add more of the cooking water, though the tomatoes make it nice and saucy on their own. Taste the chickpeas and see if they're well cooked and have soaked up the flavours. It can slowly simmer for more than 3 hours if you have the time. 

Add freshly torn coriander right at the end, just before serving. 
Serve with basmatic rice.

You can also add potatoes and kale during the cooking process if you want to make it a more vegetable meal. Though we like it plain like this and serve it with pan-crispy spiced potatoes which are super yum!

Enjoy. And think of the memories you can start making for your own children to have.

ALSO - in other wonderful and exciting news - our new benchtop was half installed today. Will be finished very very soon. Can't wait. It's so beautiful. We're all  dreaming of standing in our new kitchen and cooking and sharing and being in the space. Can't wait to show it to you. And maybe have some of you over for sharing a meal together!

Beautiful spotty bowl by Elke Lucas.


*do not ever, please please, use imported from China garlic. Local garlic grown in your country is much tastier and better for you. Garlic that has been imported from China has been irradiated.

Tuesday, 23 July 2013

making from scratch || seaweed & sesame crackers {a recipe}

With back to school looming a week ago, I was trying to think of ways to ease myself back into the school morning routine. One of the things that was so lovely about homeschooling, was the not having to make school lunches and deal with half-eaten school lunches every afternoon. Or the other kids making of fun of my kids' school lunches. And such matters.

I knew I would get myself in a fluster and a flurry every morning if I wasn't prepared. I am not naturally an early riser, so dragging myself out of bed on a cold Winter's morning in the dark little shack to make school lunches isn't the top of my list!

Best way to remedy this was make a plan. A school lunch menu was talked about, and written down. A list of options to choose from, then a daily list of what the kids wanted to eat compromised with what I wanted them to eat, and what I knew they really would based on experience. 

Added to this is my ban on buying packaged sweet or savoury biscuits / crackers, or any fast lunch-box packaged items.  For more reasons than one; the sugar / salt content is so much more than I like in either sweet biscuits or savoury crackers, the plastic packaging is crazy and thoughtless (Ryvita's are one of the few that have minimal non-plastic packaging, and aren't really kid-enjoyed!), the cost and the speed at which a packet of biscuits is consumed in my house. I haven't been buying any biscuits, bare the occasional few, for all year. 

Some time ago, Ari declared he wanted some crackers, so set about making some. Yep - my 8year old boy came up with this recipe! With a few tweaks from me, and a continual change of additions and tastings, here's our recipe for:


Go Crackers for Ari's Crackers!  Seaweed & Sesame Crackers
2 cups of flour (of your choice, can be gluten free flour or nut 'flour')
1 cup LSA (or almond meal or similar)
1/2 cup each of white + black sesame seeds (or mix up with whatever seeds you like, sunflower, pumpkin seeds, flaked almonds, etc etc)
1 TPS each ground cumin, coriander, rock/sea salt
1/2 cup olive oil (or whatever oil you like using)
A few sheets of nori roll seaweed or wakame

Mix together with enough water to just make a workable dough, not too soft. Wrap in a cloth (I use these beautiful beeswax wraps) and leave in fridge for 1/2 hour. Roll out in batches between two sheets of baking paper until very thin, chop seaweed sheets into sliver using scissors, and roll/press into crackers. Add more seeds and press in too, if you want. Score into shapes and place on baking tray (leave it on one sheet of baking paper and transfer whole lot to tray). Bake 180-200C until looks cooked; 8-15 mins. Once cool they will be crispy. 

Enjoy with homemade dips, cheeses or on their own; I've been loving beetroot/yoghurt & a homemade cheese dip lately. Nibble nibble yum yum.
I'd love to know if you make some, and any variations you work with.

Saturday, 25 September 2010

buttons & a recipe for a lovely saturday afternoon


Recipe {1} :: How to make a lovely Saturday afternoon ::
It's raining. The kids are playing with our next door neighbour boys (at their house, not mine......). I'm sitting here, with my second coffee for the day - will think about lunch when the kids come home complaining of hunger! We'll go to (their) grandma's this afternoon.* 

I'm listening to my own music (not the kid music which is on constant repeat around here. At least they've got good taste in kid music, so I don't mind having it on, but it's always good to have something a bit more grown-up).

I've been writing the big list for everything I need to do and get done before the big market (more on that later). It's more than a bit scary writing it down, and counting how few studio days I have between now and then, and we'll be away in Cairns for a week during that time as well. Family - if you are reading this - I'll be calling on some major baby-sitting and help with labeling and packing and such stuff market stuff - that you've all become accustomed to anyway.

It also feels good to be writing lists. And making real plans. For me, and for Red Seed and for my new directions. I am super excited about my new fashion range. I do like a good list to work off, and I haven't had a big event to work towards (business / creative / me wise) all year. So this is good.


Recipe {2} :: How to make buttons ::
For my little contribution to the lovely and fun ABCD gift bag giveaway, I decided to make some cookies (biscuits**). While putting it all together, I was reminded how much I like doing that aspect of event organising. (like party bags and things like that). Making the labels and tags and thinking through how it will all look. It's fun to do. A good combination of my creative and organised / planner sides. The production line of the final putting together didn't go quite as planned, due to a few reasons. 1) I left it late in the day to start baking, and then packaging up - so was rushed. That's simply the way I work, I know it now. Inspiration always stricks at the 11th hr! 2) All three kids (Ash was here too) were really excited to help me. They did the biscuits shape making, and the putting it all into bags and attaching the labels. We went through a few variations before settling on the easiest + quickest of holding it all together with a paper clip. I did want a hole punch + twine, but was too hard for the kids to do neatly enough for my likes (some things I can't let totally go of). Don't worry - the kids washed their hands about 20 times with warm water and soap while doing the making...

I got the inspiration for making button shaped cookies from Cupcakes, Cheesecakes Cookies. I'm not going to show you their shortbread buttons as ours didn't quite look as beautifully button-ish, like theirs. To our defence, we were 3 young kids + a rushed mama and we made about 140 or so, whereas they were a professional kitchen and they only made about 20 in total. Just saying.
I was pretty happy with the way they did turn out anyway. And I was really impressed by the way Ari stayed so dedicated to the job of putting the holes in all those round dough pieces. Mish + Ash did a fair bit of raw-dough eating, and silly shape making, but Ari stuck to it until they were all completed.

We made two flavours. I'm only going to give you the recipe for one, as it was my favourite. Of course, I didn't actually follow the recipe in the book. Oh no, I couldn't do anyway as simple as that - could I! We sort of started following a basic cookie recipe, but strayed so much that I think it's fair to say it's our own recipe. Here it is ::

Cardamom & Pear Button Cookies ::
1/3 cup oil (use melted butter if you like, or an oil with no distinct taste)
1/4 cup sugar (whatever sort you choose, brown probably best - I used raw, as we had no brown)
2 eggs
25 - 30 cardamom pods - crush and grind the seeds really well (remove the pod hard skins). We use a stone mortar and pestle. (which is invaluable in my kitchen).
1/4 cup pear concentrate syrup
1 1/2 cups wholewheat flour (S.R or use plain with a pinch or two of bicarb)

In your mixer (machine or by hand) beat really well the oil, sugar + eggs. They'll make a nice thick oozy mixture. Add the cardamom and pear concentrate. Then the sifted flour, and mix nice and gently (by hand). It should be a stiff mixture - if not add more flour until you can knead it easily. Roll it out between two sheets of baking paper to about 3mm thick. Using a round cookie cutter, cut until you've used all the mixture. (You'll need to rework and reroll it as you go, use some extra flour if it gets too sticky). Using the back flat part of a wooden skewer to make two or four holes, like a button. You can also use a fork around the edges if you want to make decorations like that (we didn't as the kids' didn't have a light enough touch, and just squashed the dough our of shape). 
Bake in at 180C, checking after 5 minutes, and perhaps turning them over. You don't want to burn your buttons, you just want a nice slightly light brown colour. Perhaps 10 - 12 mins at total most. Cool on a tray and serve at your next crafty get-together. 
I had some mixture that I didn't make into buttons, and rolled into a long round about 5cm thick. I then pinched smallish bits off and baked them like that, until nicely cooked. They had a different taste, as they we softer inside. I'm calling them Pinch Cookies. Give it a go, the rough edges got cooked in varying amounts, which meant some bits were more burned and some bits gooier than others. Yum. 
You could also freeze the log, until you need it, and use a sharp knife to cut into rounds. Which means you can make freshly baked cookies at the drop of a pin, or a button!
*yes, their grandad does live there too, but must face reality that grandma is the major drawcard and the one they especially love visiting. I know they do love you just as much grandad - it's just that, well.... you know anyway.

** does anyone know the difference between 'cookie' and 'biscuit'? I always thought it was the Australian / British word compared to American word. But then somewhere along the line I read that biscuit was factory made and cookie was homemade. I've been thinking that I do like the word cookie more, but then wonder if it's too American-ish for my Aussie friends. And cookie also makes me think of cookie-cutter (see alternate definition for what I mean), which is generic and not at all handcrafted, artistic.....
(By the way - I'm not entirely what one would call "Aussie" in any sense of the word. In fact, at school people used to think Sylv + I were English as we actually spoke correctly, and finished our words rather than dropping the last letter, as is very Aussie. "Ya' kno', 'ey" translates as "You know, don't you". Hey (or 'ey) being a particularly Aussie sentence ending sort of word.)

Wednesday, 14 July 2010

simple tart

At the organic market on the weekend I got some lovely looking rainbow chard (or silverbeet, I'm not actually sure if they are the same or different, but ours had rainbow stems). We decided to make chard + feta pie, which of course is very yummy, but also quite simple to make. 

I made mine very simply - and both the kids ate it all. Ari didn't like the pastry, but I don't mind that, at least he ate the filling and the salad. 

Firstly pastry - you don't need any equipment at all. There are quite a few different recipes that I use, well actually I barely use a recipe at all. Just rememberings of things. But it's as simple as making bread, only you put it in the fridge to set for at least 1/2-1 hr, rather than letting it rise. If you don't want to make your own pastry (though really it is much cheaper and better for you + the environment) you can use puff or filo pastry.

My quick pastry:
flour (you can use wholemeal, plain, spelt or whatever you prefer, though I've never had much luck with rice flour)
butter - frozen is good, and you can grate it in (you could also use any vegan substitutes you have)
Mix it with your fingertips, until it resembles breadcrumbs. My kids love doing this (though if your kids are prone to this sort of thing -last photo - I'd possibly advise against!!). Slowly add a few bits of water until it forms into a dough mix, then knead it lightly. Put it in the fridge, in a plastic bag, for at least 20 minutes, though 1hour is better. {While I don't actually bring plastic bags into the house there is always something to use. That random bread bag, or the plastic bag a friend brought in, or the one you accidently got on the day you were feeling tired and stressed and hasseled by the kids and forgot to take your vege bags}.
Once you've left it to do it's thing in the fridge, roll it out and put into your tart/pie tin. I don't grease my pan, but I suppose you may need to depending on what you cook in. If it's not rolling too well, you can instead push it into the tin with your fingers forming it across the base and up the sides until it's sort of thinnish, but no holes please. Then back in the fridge for 20 mins - while this part is not absolutely necessary (and often doesn't happen at my house), it helps the pastry to not shrink while cooking.
I always put it in the oven for a little while before adding the filling, but I don't (currently) have a very good oven. Do remember that the filling it cooked, so the pastry will need extra time. But don't over cook it at this stage. Perhaps 180 for 15mins ? check it, and keep an eye on it.
{this pastry doesn't look really cooked, but believe me it was 
yummy and flaky and crumbly just the way it should be}

For the filling, what we did was:
Fry some red onion (you could use shallot, leaks, white onion, anything) in olive oil. Oh first, fry off your spices; I like cumin and coriander and whole black mustard seeds, and also whole fennel seeds (but my family are a bit fussy about the fennel..), and a bit of sea salt + pepper (do keep in mind, when adding the salt that feta can be quite salty itself, so taste your feta and season accordingly). Then add the onion + garlic and lightly fry. Don't let it burn. Then I added the silverbeet stalks, cut up into smallish rounds. And after that's cooked on the pan {I swear by my cast iron, cheaper version of Le Creuset}, I added the silverbeet leaves cut up sort of roughly, not too small, but not too big.
I sploshed in a bit of water, and put the lid on. With low heat I let it cook for a bit, to let the silverbeet break down.
I decided to make a quick white sauce to add to it. - just a blob of butter, a spoon of flour - mix on the heat, then add milk (I add cold and stir really quickly to get out any lumps). I added the sauce to the silverbeet mix. It's just as good without the white sauce.
Other things you could add are red or green lentils (cooked first, of course), potato, sweet potato, pumpkin (you could just lightly steam/boil that, until tender then cook into the silverbeet). 

Then put your filing into the pie case. We put the feta on top, and sort of pushed it in, but you could just as easily mix it properly through the filling (and add other cheeses too, if you want). No lid as the pastry didn't stretch that far (forgot to buy more flour at the healthfood shop). Into the oven until the feta is nicely melty and possibly has a good burnish-golden brown on it. 

I often make pies quite differently to this. I suppose this really would be called a tart, rather than a pie. But whatever - it was very yummy. Sam ate up at least 2 helpings of seconds (me as well, but that goes without saying - you may like to know I have my Winter coat on - on my tummy, bottom + thighs.....)

We served it with a very simple salad. Mini roma tomatoes, lebanese cucumber (if you use the other sort, and have never tried a lebanese one, please try one as they are must tastier, and less watery), fresh yummy market carrots (well, it was all market stuff, but organic carrots are often so much more sweeter than non-organic), red capsicum (both Sam + I prefer green, which we find sweeter, but the kids prefer red), and torn parsley leaves. Topped with a good glug of olive oil and generous squeezings of lemon or lime juice.

Gina - I think silverbeet + haloumi pie would be yummy as well. You could mix the haloumi in, or put it on top and it'd go all gooey and golden (unless you have a terrible oven like mine!).

Please let me know if you make this simple easy tart, or any alternatives.

*Ha, I bet you all thought that the title "simple tart" was about me, hey.... hmmmm - I know you!

Saturday, 15 May 2010

saying yes


Sometimes I just keep saying no.
For many reasons
It's too hard
too annoying
too messy
too much effort

I'm too mean
too lazy

couldn't be bothered.
Yes, I am a mean mother
aren't I?

Anyway. Yesterday when Mishi asked me to make playdough I said
yes

And you know what.
It was easy and fun and lovely and resulted in many glorious hours of happy play. Yesterday and today, and probably tomorrow as well, at least.

Recipe :: 1 cup of flour {don't use expensive organic, like I did - but then again, if it's all you have in the cupboard, then just finally say yes and do use it!} 
:: 1/2 cup salt 
:: 1/2 cup of water {we steeped some Karkady flowers (Hibiscus tea) in hot water to get a beautiful light pinkish colour}
:: 1 teaspoon of tumeric powder makes a lovely soft yellow colour

{More wonderful reasons why you don't need to go and buy that fake food colouring}.
Let your kids mix the flour, salt + tumeric (or omit if you're making the pink colour), then add the water (or brewed tea for pink colour) bit by bit until you have a good kneadable consistency. It shouldn't be too doughing or wet - just add more flour if you need. Keep it in the fridge in a container, when not in use.
Give the kids a flat, easy to clean surface with some rolling pins, cookie cutters, and their imaginations. 
Then go off and have a few quiet moments on your own - or stand and watch the beauty that comes from saying yes.

{old faded laminex table and daggy kitchen floor with thanks to our house}
{chip in blue cup courtesy of our teeny tiny ceramic kitchen sink - cute, but inconvenient}
{Mishi's hair-do by herself - a look she sports most every day at the moment, in some form or other}
{lovely yellow tea towel is from here - currently on sale, though they've been in our home for at least a year or more}.

Monday, 1 February 2010

baby cakes, hearts and an ant

My kids like having "something sweet" for afternoon tea.

We all sit down, at our outside table (where we eat most every meal at the moment), and share our treats, an afternoon coffee, or warm milk, and some conversation. Talking over our day, or trying to decide on our dinner (every day, the thing of trying to decide what to make for dinner).
Yesterday we baked some little cakes. Some for Ari to take for school lunch. And some for us to have for afternoon tea.
Very easy to make, very delicious, and quite good for you - in the scheme of chocolate cake. 

As you can see, they don't last very long. These photos were literally taken click, by click, by click - my camera could barely keep up with the little hands disappearing cakes!
Recipe (if you're interested) goes a little bit like this* :: Chocolate Beetroot Baby Cakes
Cream together 50g butter + 50g soft brown sugar (you can also melt it together in a bowl over a saucepan of hot water, if your butter is too hard - like ours was!). Stir really well, to cool it down a bit, then beat in 2 eggs. Add 75g cocoa powder, 100g finely dessicated coconut and 1-2 finely grated fresh beetroots. Stir well. Then add 2T plain yoghurt and 1 cup milk. Gently stir in 100g self raising flour. You want a fairly wetish (but not totally runny) mixture, that is easy to transfer to your cup cake cases. So add more yoghurt if it's too dry, or more coconut if it's too wet. 
Spoon into little cupcake cakes, and bake until nicely cooked. (Our old oven is so unpredictable, I can't honestly tell you what temperature it bakes at; but most little cakes take about 12-15mins in 179 degrees C, oven. I do so so so miss our beautiful new oven, at our other home, and can't wait until we buy our own home again so we can have a beautiful kitchen!).
We bought these heart shaped cupcakes, at the insistence of Mishi - she wants them for her birthday party. (The little round ones have been in quite constant use for a long time). I've been using silicon cupcake moulds for quite a while now (year or so?), and while I guess the plastic isn't a fantastic thing to be using, I have never had any cakes that haven't unmoulded with ease, and don't have to use papercases all the time. (I have, in the past, had big issues with metal cupcake tins not unmoulding easily, and having half cakes fall out inside of the whole cake slipping out easily - I do recommend these little silicon baking cases, if you're having those issues).
*baking with two smalls means that measurements are never quite accurate, and stirring is a bit erratic. And given my personality, I never follow a recipe, making the cake and quantities up as we go along.
 
{can you see the little ant who was enjoying our tasty cakes, too}.

Wednesday, 23 December 2009

cookie factory


We made some cookies, yesterday, to give the kindy teachers today.
We mixed, measured, rolled and cut. Then waited and waited for our (old old) oven to bake them. We made 5 batches in total. Enough cookies for everyone.

This morning the kids wrote their labels, and filled the bags - carefully counting them out, and deciding which shapes would go in which bag. While Ari + I tied the labels on with some lovely hemp twine, he talked about us being the packing and wrapping section of the cookie factory.
He's quite into factories at the moment. Mainly because of Willy Wonka.


The smell of orange throughout the house last night, was so lovely. I'll for sure be making some orange cookies again. Ari did declare them to be quite yummy.


Vanilla + Spice Cookies ::
Start with 125g room softened butter, mix with your fingertips into 225g plain flour, until resembles breadcrumbs. Add 80g soft brown sugar, 2 capfuls of vanilla extract, and 1 teaspoon each of cinnamon, nutmeg and mixed spice or ginger powder. Roll out onto a flat surface, with some flour to prevent sticking. Using your favourite cookie cutters, cut as many shapes as you can. Then re-roll and cut again until you're used all the mixture. Place onto baking tray, lined with baking paper. Bake at 180C for about 15-20 mins, or until just golden.

Orange + Coconut Cookies ::
As above, but substitute about half the flour with dessicated coconut. Finely grate orange zest, not peel or rind, into the mixture. Add sugar and vanilla. A little squeeze of fresh orange juice, is you need the mixture to be a little bit wetter. Roll, cut and bake as above.

Enjoy!

Thursday, 28 May 2009

on a thursday :: roses and cakes

this vase is right beside where we walk past, i bend down many times a day to inhale the intoxicating perfume.sylve, my sister, who gave the flowers to me for my birthday, saw them today and said that even though they haven't lasted a long time, they were worth it.
the roses have started dropping their petals.
the girl bent to pick these petals up, at the same time that i reached for the camera to take photos. sometimes still life that i see gets caught up in the flurry and movement of life. can't be helped.
yesterday the boy made some muffins / cup cakes / baby cakes.
at the age of 4.5, he is already a very talented and intuitive cook. he does lean towards sweet things, though he often makes great savoury snacks.
he collects everything needed to make the cakes. remembers the general guidelines and ingredients. pours in a little milk and some cocoa, with sultanas and berries, sometimes coconut, and flour. spoons them into the little cases. and we put them in the oven for him.i am slowly trying to teach him to clean up when he is finished.these were a little tough and chewy. when i said that perhaps it was because he had put the flour in first and mixed it too much, he said 'i didn't know', as if a 4.5yr old should know things like that. but i think next time he will know that.

take notice - if you don't feel your children afternoon tea in time, they will make it themselves! some days i only have to make dinner around here.
Related Posts Plugin for WordPress, Blogger...